MikeB
Admin


Location : Bristol, UK

|
 Subject: Night Photography Guide 2009-01-31, 13:50 Subject: Night Photography Guide 2009-01-31, 13:50 |
|
|
Aviation night photography is something that seems to have picked up recently, with the opportunity of on base shoots and night operations. A few requests have been made about settings etc. used to take night photos, so I’ve put together a little guide. I don't claim to be an expert at Night Photography (or Photography full stop!) but here’s some guidance based on what I've learnt from others and from my experiences of Night Photography. So if there’s anything you think is wrong, feel free to PM me :).
What do you need?
- Tripod
- Remote Shutter Release (Optional)
- D-SLR/Bridge Camera (That allows manual control of Aperture and Shutter)
Tripod
A tripod is essential for night photography, the use of long exposures mean that any movement of the camera whilst the shutter is open will result in a blurry photo!
The main rule when buying a tripod is 'you get what you pay for'; a sturdy and stable tripod will prevent the risk of movement whilst the photograph is being taken and make sure that the camera is secure on the tripod. However that doesn’t mean a cheapy tripod won't do the job perfectly - They will! Most tripods have a hook underneath the center column; it's always a good idea to hang your camera bag off this to give the tripod added stability, especially on a windy night.
Shutter Release
As it is mentioned above, during the process of taking a long exposure the camera must be perfectly still at all times. However there is a problem, when you press your shutter release button on your camera, it may shake. This is where a remote shutter release device is helpful; it will allow you to fire your shutter remotely (no need to touch your camera!). There are two options available; a wireless IR remote (reasonably cheap for most cameras - normally under £20) or a cord release, which are a lot more expensive. Obviously the main disadvantage with a IR Remote is that if several people are in the vicinity of each other and all using the same manufacture of camera with IR Remotes, you will be setting each others camera's off!.
You'll notice the 'what do you need' list had (optional) next to remote shutter release. That is because you don't need one, most cameras have a self timer feature, allowing you to press the shutter button and then X seconds from then, the camera will fire the shutter. The amount of time the camera waits until it fires ('X') is normally programmable, however I wouldn't suggest anything less than 4 seconds as you need to allow enough time for the camera to rest before the shutter is released. Obviously the self timer has a flaw when trying to photograph active aircraft (taxing), as you have to predict when they are going to stop (5 seconds ahead) and then hope that they stay still for the length of your exposure. But it is possible (see Picture A - B-2).
Settings
Below are a list of settings you may need to change, depending on the environment you are taking your pictures in, with an explanation why.
ISO Low - ISO is the measurement of the sensors sensitivity to light - Although you may think that due to the lack of light when taking night pictures, you will need to set a high ISO setting - that isn't the case. High ISO speeds (depending on the camera) introduce noise to your images, in some cases you don't have a choice (action shots). However with static aviation night photography, you have the ability to use long exposures and are not required to use a High ISO for light. So choose the lowest setting your camera will allow (100/200 will be fine).
Long Exposure NR On - Long Exposure Noise Reduction - This setting is quite self explanatory; When taking long exposures certain pixels on your sensor heat up which results to noise in your image, the Long Exposure NR setting reduces that noise by taking a second exposure but with the shutter closed (dark). From this second image it can then identify the hot pixels and remove the noise from the final image.
Exposure Delay/Mirror Lock Up - Although you won't touch the camera to fire a shot, there is still a small possibility that the camera can move when the picture is taken. The mirror inside the camera has to flip up to allow the sensor to take the picture, the 'slap' can vibrate the camera. However, it isn't a massive issue and in most conditions will not result in a blurry photo. But there are two settings you can use to prevent this from occurring; Both the Mirror Lock-Up and Exposure Delay features do roughly the same thing. The mirror is raised before the exposure is taken, therefore reducing the vibrations caused by the mirror slap.
White Balance - White balance is the measurement of colour balance/ temperature in the photo (Measured in Kelvin) - The setting you use for white balance is dependent on the environment you are shooting in, many airport/bases aprons use sodium lights which will give your photo a orange cast (e.g. street lights are sodium) by setting your white balance correctly will remove this cast. If you are shooting JPEG it is best to get this right before you take the photo, however if you are shooting RAW the white balance is adjustable in your RAW Editor. For sodium lights it is best to choose the Incandescent Preset on your camera. But I would advise you shoot RAW and fix it after if it’s wrong!.
Once the above settings have been configured (I normally do so before leaving the house). You only have two settings to worry about - The Shutter Speed and Aperture
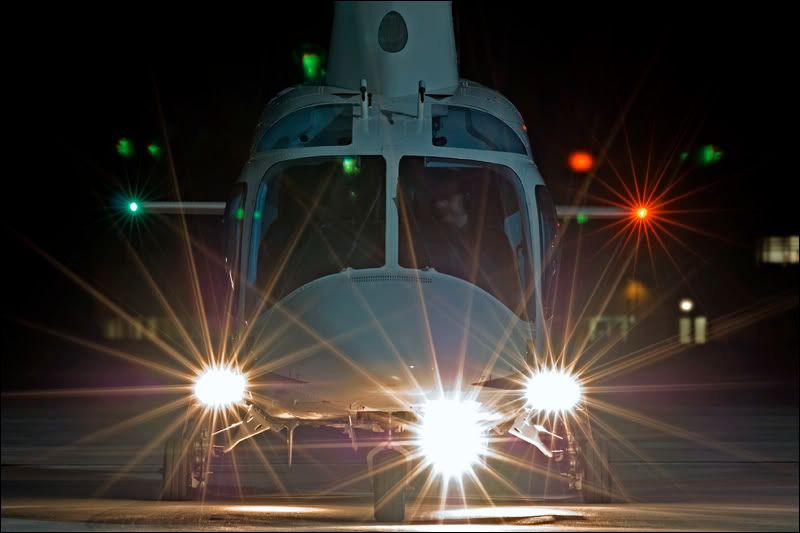
Aperture - As with daylight photography, you want to maintain your lenses 'sweet spot' which is the aperture that your lens is sharpest (Normally F8/F9 +). As with the ISO Setting, you may think that due to the lack of light, you want to allow more light through the lens by choosing a aperture such as f/2.8 or f/5.6; Once again that isn't the case, with static aviation photography you can gain light by using a long exposure and in the end you will have a well exposed picture that’s sharp throughout, rather than a well exposed picture with certain parts of the aircraft soft. The smaller the aperture (higher the number), the larger any flare will be on aircraft lights, apron lights etc. (also known as star burst).
(See Pictures A, C, D, E for examples of star burst lights)
Shutter Speed - Through out the guide I have mentioned using long exposures to gather light, this is because there is little light for the cameras sensor to use to capture the picture. To allow more light to enter the lens, a slower shutter speed needs to be used; this will keep the shutter open for longer to allow more light to enter through the lens. Normally over 1" (a second) is needed. For very long exposures, such as aircraft light trails, its possible to use a shutter speed called 'bulb' this will allow you to decide when to close the shutter by pressing the shutter release button again (See Picture F for example).
Camera Mode - There are three modes that you can use for shooting at night (Excluding Auto/Scene Modes :evil:).
Aperture Priority - Will allow you to control the aperture only, the camera will work out the shutter speed using its exposure meter. This can be a good mode providing you are not shooting into a bright light (such as Picture E - A109) which the cameras metering may choose a faster shutter speed and underexpose the image.
Shutter Priority - Will allow you to control the shutter speed only, the camera will work out the aperture using its exposure meter.
Manual - The mode I now always use when shooting at Night, allows you to have full control over your picture, you choose the aperture and shutter speed. See below for help exposing your picture correctly.
Exposure - Most cameras that allow manual control of the aperture/shutter have a exposure meter in the view finder (sometimes on the top/rear LCD too). An exposure meter looks like this [+ . . 0 . . -]. The idea of the meter is, if the vertical lines are to the right of the 0 the camera thinks the picture will be under exposed. If the vertical lines are to the left, the camera thinks that the picture will be over exposed. When the vertical lines disappear or show where the 0 is, the camera thinks that the exposure is spot on.
Adjust your shutter speed/aperture until the meter indicates that the picture will be exposed correctly. This does not mean that the picture will be, like with the Shutter/Aperture/Auto modes, this is just what the camera's exposure metering thinks is correct and there are many factors that could fool the metering.
The only judge of exposure is your eye, either by looking at the picture on the LCD Preview or checking the histogram. From this decide if your picture needs more exposure (slow down the shutter speed or lower the apeture) or needs less exposure (speed up the shutter speed or make the apeture higher).
NOTE - In well lit conditions (under apron flood lighting) auto focus should function fine, however in poor lighting conditions it may not be so accurate, manual focusing may be needed.
Example Pictures

Picture A - B-2A - 8 sec - F/16 - ISO 200

Picture B - Tornado- 6 sec - F/8 - ISO 125
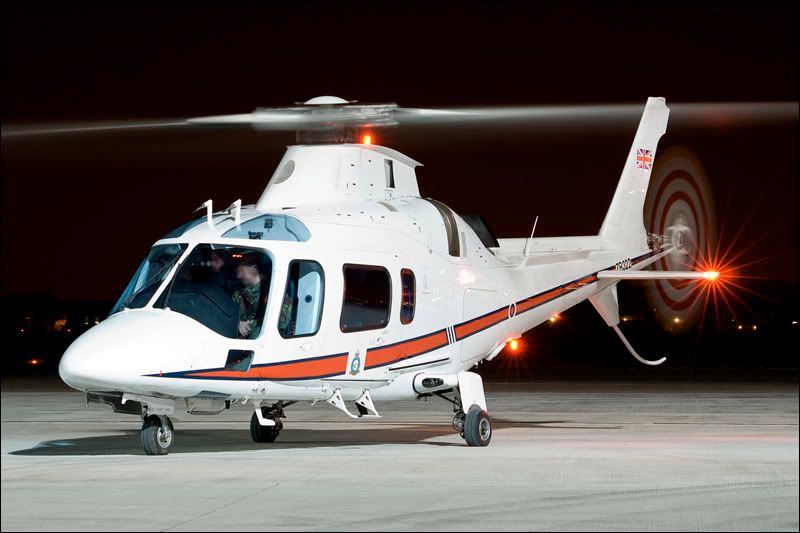
Picture C - A-109 - 13 sec - F/10 - ISO 100

Picture D - Merlin - 20 sec - F/10 - ISO 100
Picture E - A109 - 1.3 sec - F/10 - ISO 100

Picture F - Night Trail - 163 sec (Bulb Setting) - F/22 - ISO 200 - ©Steve Smith
It's easy once you get the hang of it!
Hope this helps, if anyone has questions feel free to ask.
Mike
Last edited by MikeB on 2009-01-31, 15:22; edited 1 time in total
|
|
GreenBat

Location : North Wales
Spotter Watch Member : no
|
| Subject: Re: Night Photography Guide 2009-01-31, 15:06 |
|
|
|
Thanks Mike, that is all spot on, and a very useful article :D
|
|
ramjet

Location : Hatfield
Spotter Watch Member : Yes
|
| Subject: Re: Night Photography Guide 2009-02-01, 05:56 |
|
|
Thank you Mike, that's great - very interesting.
As in all things I suppose practice, practice, practice.
Cheers, Roger
|
|
IanAstles
Photo of the Month Winner


Location : Knaphill, Surrey
Spotter Watch Member : No
|
| Subject: Re: Night Photography Guide 2009-02-01, 06:24 |
|
|
What a guide! Thats awesome thanks for taking the time to write this.
Ian
|
|
LeeHathaway
Location : Fairford
|
| Subject: Re: Night Photography Guide 2009-02-01, 06:41 |
|
|
|
Thanks for this Mike, a very good guide and well produced!
|
|
GOOSE
Moderator


Location : UK
Spotter Watch Member : No
|
| Subject: Re: Night Photography Guide 2009-02-01, 07:13 |
|
|
|
Nice one Mike, you top, top Fighter Controller you!!!! 8)
|
|
hawks922

Location : Birmingham, West Midland (Geordie Born & Bred)
Spotter Watch Member : No
|
| Subject: Re: Night Photography Guide 2009-02-04, 04:31 |
|
|
Although those of you who have done night photography before will hopefully know this, but pack a small torch in your camera bag so you can see the camera settings, otherwise you will be like me trying to see the setting by Gas lighter lol.
Oh and make sure you're equipped with a cord shutter release remote as the Infra Red one may require you to stand in front of the camera to get to the sensor.
*** These mistakes I have learnt from, so others are better armed with usefull common sense for the situation ***
|
|
HighlandSniper

Location : N E Jockistan
Spotter Watch Member : No
|
| Subject: Re: Night Photography Guide 2009-02-04, 04:53 |
|
|
Excellent tutorial Mike, most informative.
Further to the torch suggestion, I carry a small Petzl head-light in my photo-rucksack which is great as it leaves my hands free. You don't need one of the big climbing/caving lamps, there are very neat little units which run on AAA or watch batteries and don't cost an arm or a leg.
I've always thought the need to be in front of the camera to use an IR remote to be rather short sighted of the manufacturers - I bought one of a Canon EOS 100 about fifteen years ago and learnt the hard way, corded-remotes from now on until the makers show more imagination.
|
|
MartinNeedham
Location : Macclesfield, Cheshire
Spotter Watch Member : Eh, No
|
| Subject: Re: Night Photography Guide 2009-06-05, 14:09 |
|
|
Very well written and informative guide here Mike. Have both used it myself and passed it on to friends.
Martin
|
|
Sponsored content
|
| Subject: Re: Night Photography Guide |
|
|
|
|
|