|
|
Q shed and Lightning news |
 |
|
| Author |
Message |
320psi

Location : Nottd

|
| Subject: Q shed and Lightning news 2009-09-12, 16:04 |
|
|
Hi all, Im sure some have seen this thread before but if not, here goes are you sitting comfortably ?
As we are now nearly at the end of our 5th year since begining to rebuild the Ex Wattisham Q shed (we began the rebiuld in May 2004 and 'obtained' the shed in 1995) I thought I would go though all the hundreds shots Ive taken and create a photo diary for you all.
Please dont be afraid to ask questions and make comments
Firstly heres a 'staged' publisity shot taken in the mid sixties when it was all new

And a great shot of 'our' shed taken in the early 80's with the 'Reds' beating up the place after a refuel, interestingly those camo doors at the front were the originals, in typical military fashion they were replaced only 5 years before dismantling, so we got new doors all nice and green [;)]

Now fast forward to the same Wattisham 'shed' in Dec 1994, we visited it a few times to take photos, get dimensions, mark up all the steel work to create a GA drawing of the structure (we didnt have and didnt know at the time that the original drawings still existed, which we 'obtained' at a later date, thank god, as it was a big 'flat pack' which comprised tons of rusty steel [;)])

Notice new green doors [;)]

Left bay (those doors are soon to be be rehung [;)])

Then the dismantling began in mid Jan 1995, I arrived early one morning about 2 days after the job had started and took this shot, as you can see the bungalow had already been bulldozed, (we didnt get the dimensions[:(]) But vsisted Binbrook in 2005 and got all we needed from the wreck that was once a Q shed and bungalow)

Two days later


I couldnt stay any longer than 3 days on site so left at this point,(work called [:(]) the next time I saw the 'shed' it was loaded on 7 flat trailors (that cost £2000 to hire for the duration) and sitting at Brunty, waiting for us to unload it all, which took 4 weekends in late Jan 1995.
And after alot of blood, sweat, swearing and cold hands, it was all on the ground where it would stay for another 9 years.
When I look back I can hardly belive we have pulled this off, it all seemed such a massive effort to get it all started and to then carry on.
Here we go, found them
The first of 7 trailors with the front doors beams on (7 ton each)

Me back in 95 [:0]


One off

And one more, the frame work over the doors

There was tons more as you can see, all layed out on the ground, we would periodically go round there and turn the steel I beams over so where the water layed the rust didnt get to bad, we coated it all in wax oil and kept oiling the runners on the doors and never ending task, which has payed off

Then May 2004 after 9 years of really hard work behind the scenes firstly getting planning permission (this was nearly a show stopper for a long time), we finally did it though,we were messed around by people with false promises and all the time we pressed on raising a 'starting capital' fund which was 30k
We then beagan the job of clearing the site and there was tons of stuff to move

June 2004 we began to remove the covers from the Rub hanger


We then had a gap of a few months while we orgainsed a crew of chaps to dismantle the frame work and remove it from the site
Sept 2004

This is the site in early Oct 2004, next job to do was to have the large earth bank at the rear of the site removed (many tons of earth)

And one from on top of the bank

And by mid Oct 2004 the bank was no more, site cleared

Next major job was to move into place the new stores potacabin and 'butty hut' van late Oct 2004

Few more to come
|
|
| |
|
320psi
Location : Nottd
|
| Subject: Re: Q shed and Lightning news 2009-09-12, 16:16 |
|
|
We then emptied old stores cabin and said goodbye to it
Early Nov 2004


And by Mid Nov 2004 the first trailor load of rusty Q shed steel work was moved onto site (this was a big mile stone)


We then began the thankless task of unloading it all and sorting it which took us from Nov 2004 though to Feb 2005 (nightmare)

Tons of steel work to be wire brushed and painted [:(]


Once all the steel work was organised the job of measuring and marking out the base for the main uprights foundation blocks was begun
March 2005

This is one of the upright beams bolt setting jigs that were set into the concrete blocks

The blocks set into their holes March 2005


And then by the end of March 2005 another major step was taken the uprights were lifted and bolted into place, another nightmare weekend

While all this was going on we and a local guy who's day job was removing tree's (and gave his time free) were constantly cutting tree's down around and in front of the site, this also entailed removing the roots of some, a night mare task, which ended up with us pulling up a BT cable [:0][:0]
But we had loads of great bonfire's to satisfy the pryro nutters amougst us [;)]
Around this time we employed a sandblaster/painter to get all the major sections cleaned and painted
May 2005


With the major sections completed and never ending task of wire brushing and hand painting the many other smaller sections continued and still does


We then put in our first diagonal strut, a big day for us, 7th May 2005

It was then onto the big sections, bolting them together and having them lifted into place May/June 2005


Front door beams going in

Rear door beams going in

The roof beams were next June/July 2005


And the mirid of other steel work that goes in above the front doors was completed by Nov 2005, all this had been gas axed and dropped from 35ft up back in Jan 1995 so was bent to Bu*****, we spent ages warming sections of it up and strainghtning them out
It all went up and was bolted and welded in place perfectly, our efforts payed off.


Now these shots might not look much but they show two weekends of work, the personel door frames (3 of them) were found under tons of rusty steel, we sorted them out, straightened them and bolted them in place, so events like these were big for us


Next step was to remove the earth bank at either site of the entrance drive way Dec 2005, tons of earth


We then had a little gap while we sorted the tons of broken bricks needed to fill the area up to the correct level Feb 2006 the first loads arrive (55 25 ton lorry loads [:0])

Once the material was delivered we then had it rollered down and leveled in March 2006


And then stopped for a while as we are 'brasic' money was rasied over 2006 to fund the big part of the project the concrete, which was started in Mid Oct 2006 and completed by the end of the month at a cost of £33,000


It will never fly, and never did [;)], the polishing gizzmo

And finished, oh what a day, yippeeeee [:D], never have or am I very likely to be so exited about 12,000sq ft of C50 concrete

And the crowning glory on Nov 25th 2006 we moved both aircraft into place on the QRA hanger site
We moved them on a miserable, cold day from their home of 18 and 13 years


And here's a good one for you caption 'competioneer's' this is what greeted us on the morning we backed the aircraft on the pan for the first time, brilliant, you couldnt have planned it [:D]


And on the day of our Xmas 06 antidet run with 904 and our little get together we rolled 904 under the frame for the first time and got this shot

In the April of 06 we had a little photo day


Then after a long spell of inactivity on the shed (spring of 07), we did some more graft
This is what 29 tons of tarmac srappings look like, all ready to make a nice smooth access road down the
side of the hanger (it all exiting stuff you know this Lightning preservation lark [;)])


This is what was left of the crushed bricks we used for the hanger base, now used as the base for the road

One digger


And as if by magic 3 hours later after some smoothing out with shovels.


We will now leave it for a few weeks, let it settle and then hire a roller and pack it down.
The finished 'road'
And a shot of the finished side road

McAlpines eat your heart out :D
Then in late Sept 07 we had a four day bolting/welding and painting marathon on the hanger frame, we managed to finish all the bolting up (Yippppppeeeee) at last the end of that job !
We then began to wire brush the ruff bits and slap the undercoat on for a second time in 2 years, we got about 30% of the east side roof bay 'longeron's' painted all over.
8.30am on the handle of the sissor lift (Thanks Dave W)

30mins later and Im there :D


There's alot of it when yo get close


Last bolted and welded area

One brush, one old paint pot with the 'Rolls Royce' of undercoats in it


We had 3 days in early Oct to finish the painting of the under coat, I would say they were three of the most memorable in the LPG's 19 year history, the weather was perfect, we were able to use 3 sissor lifts (3 painting teams) and we had a really good turn out, so we cracked the paint tins open and literally blitzed the under coating of the frame, we finished all of the roof structure by 3.30pm :D
We started the silver top coat but the grey primer hadnt properly cured so we decided to leave the silver untill next weekend.
Third Sissor lift arrives


Finished


Silver sections is how it will look

Some high level shots of the two old girls, waiting for a home


Then the roofing guys arrived on on site for their first day in Mid Oct 07, they fixed all the netting,scafolding inplace and unloaded all the roofing materials and began work
Here's a few shots late on a Saturday afternoon, showing all the netting and saftey rails in place


And after a good week weather wise the 3 guys have done a brilliant job of the roof


And some of the new panels, top and side cappings waitng to go on

I popped into Brunty one afternoon to see how it was going, the east bay was finished and the west bay would be finished off within 24hrs, the rest of the week the lads fitted all the top and end cappings then the outer gutters and down pipes..


Top surface inspection (sad I know but its not every day you get a Q shed roof) ;)


Well what a day, mid Nov 2007, the weather did its best to spoil things but it couldnt dampen our sprits, just brilliant thats all I can say, the culmination of alot of hard work over the last 12 years.
The pictures say it all
The 'grils' first thing this morning waiting to go inside


One finished Q shed roof

Waitng for the old girls

Tyres off !!!!!!!!!!


Where they belong from now on :D :D

XS904 first

XR728's turn next

At last under cover :D


We had a little group shot

Then a lttle 'bubbly' and a lovely QRA cake (thanks Anne Norris)


Oh and abit of LPG 'banter,' one of the members, Andy Brooke pretty much on his own back in the summer layed the side road to superb levels of quality while we refuled them both, so I made him his own road sign ;) ;)


And then to Jan 08

728


904


And all of us in Dec 07

We now jump forward to Sept 08, as we have spent most of this year like most years rasing more cash before we start the next bit.
We dug out the underfill material thats come out from under the back of the hanger on 904's side, in readiness for a concrete pour which will stop us loosing all the base material, got all the shuttering in place as well,
Moved 904 out and covered her, those tyres havent got any lighter,:rolleyes:
There's also been a load of silver paint slapped on the Q shed frame ;)
Generally a really good, got loads done.
Some pics for you


904 outside


Shovel ready for digging

Done and ready for concrete

And in that week the lads arrived and we poured
Met our floor contrators at 8am, lovely morning at Brunty sunny and warm, anyway the concrete lorry arrived at 8.30 and we began to pour 1.8 cube at the back of the hangar, god I wouldnt want to do that every day, my poor old back :eek:
Got its all sorted by 10am payed the driver and left our flooring guys to it, leveling the floor on 904's side that is;)
Got a call about 3.30pm, all finished and laser leveled, we are gonna have to wait a week now for it to go off properly and then stick 904 back inside.
Must say this one has taken some time to sort but Ive cracked it.
Few piccies for you


All this might not be very exiting 'aircraft stuff' but these kind of events make the bigger picture of finishing the shed seem more real, Im sad I know, but its all done in 'bite sized chunks'
Takes alot of time and organisation as well :rolleyes
And then by Nov 08 we had the funding for the doors, all 15k of it
The jobs to do were to get the areos out and covered up and to then uncover the front doors and their running tracks from 15 years of hibernation.
All were successfully lifted and moved into the hangar ready for the contrators to start work tomorrow, Monday 8th Dec oh yes !!!:D
Few piccies from today, which was a 'coldun'
Outide in the cold for abit

Big gaps where those doors will soon be :)


Doors waiting, wont be long


And the all important top tracks


One of the slots where it all hangs from

And the very important rollers, lovingly coated in endless amounts of my old engine oil from the last 15 years, all still turn freely thankfully

And the other job today, clearing the rubbish, kept me warm ;)
Before

After about an hour of sweeping and digging [;)]

And finally the back doors, awaiting their turn, best guess 2 years away

Went over to Brunty to give the lads a hand and see how they are doing, I cant keep away, its apart of me
Their doing very well to be honest, considering it has been very cold up there since they started on Monday, so only 3 days in.
And the painted bits ready for reassembly


I was pleasantly suprised to see the lads getting on with the floor track slot cutting.
They were also just waiting for a bigger set of sissor lifts to be delivered so they can start fitting all the upper track section hanging brackets, as you can see below they had already got one up, and wonderfull sight to behold it was to, well for saddo's like me anyway :rolleyes:

One 8" x 6" slot ready to be dug out

One serious concrete cutting machine


Lots of lovely shot blasted and painted upper track hanging brackets

And the very first one in place !!!!! :D:D


They are further ahead than I thought they would be :)
They are back tomorrow to fit the rest of the track brackets and will return next week to hopefully get the lower tracks set and maybe concreted into the floor
And we finally come to last Sat 20th Dec 08
Well what a day, wet and cold, to wet
But we managed to get them both back inside for Xmas as the door lads have now knocked off for their break.
We will be back on the 3rd Jan to pull them both out again to allow the doors work to carry on Mon 5th Jan.:)
Our Xmas bash was a real goodun, loads to eat, loads to laugh about, plenty of good chat and lots of us there.
Few piccies for you
All the upper hanging brackets in place

Brackets and tracks in place on the other side

728 in first


Then 904


And you guessed it, as we were leaving, just before sun set the sky cleared 

Piccies of the doors progress:
Right hand side top tracks all up and ready for fitting of the height/level spacers, they will be going in early in the week

Left hand side top tracks up with spacers fitted

Height spacers close up

And one big slot across the front dug out and ready for the new bottom track to be cemented in


Well, they are up, working (2 man push) and finished :D
They will need lots more wire brushing and oiling on the inside 'sliders' and the front needs pressure washing, but..............
From this in May 2004

To this, now:
Ta Darrrrrrr :D


Even got the top panels on, these act as a dirt/rain guards

No more covers at all, not one in sight :)
Well apart from the all important tyre covers ;) ]


Stood inside taking these shots and while I was standing there with the sunshine on the outside I could feel the heat radiating off the inside, so we have heating as well !!! :)
I cant tell you how much this means to us and the two old girls, words wouldnt do it justice.
My prime reason for going today was to take 2 of the 12 window frames and offer them into the apetures to see how they fit and what we need in the way of more steel work
One large 'ole'

First one just 'layed' in the frame

And one of the 120 panels and fillers Ive made


Stood and measured up, scratched my head a few times, went up and down the ladder a few times, wandered around, and finally sat in the sun having a cup of tea thinking, you know the kinda thing ;)
Anyway as I sat there leaning against some large 20ft steel, rusty plates, that have sat on the back doors which are covered with old cladding, I began looking at them and thought ummmmmm, they look like the very thing I need to locate the windows, and hey presto what do you know, we have all the bits !
All very rusty and bent, but nothing a good wire brush and a welding plant and a coat of paint wont sort out :)
Amazing, considering when we unloaded this 'shed' it was the best part of X tons rusty steel, all the bits are still there, even the fillers between each window frame ! ;)
So apart from the fixing plates, which wont take me long to knock up, we have it all.
|
|
| |
|
320psi
Location : Nottd
|
| Subject: Re: Q shed and Lightning news 2009-09-12, 16:27 |
|
|
Really productive day today, lovely sunny weather as well.
We manged to cut, drill and weld in all the new steel work that was cut when the hangar was dismantled back in 1995.
Its spans the centre of the of the main door beams and around the corners and acts as the frame work which holds the cladding on in these area's.
Might not look much but it was b***** hard graft
One mag drill

Front section 10am this morning

Right hand corner

Left hand corner

Centre ones going in

Done

One of the 8 new corner supports

Right hand side bolted in place

Welding

Done

Left hand side bolted in place

Finished ;)

Next weekend the plan is to straighten, cut and weld in new sections on the top of the main door grinders, these sections act as the frame work for the peaked form 'roof' cladding right on the top.
Rough picture but gives you the idea

Birds eye view of Bruntingthorpes collection

Oh and our little 'helper' today ;)

And we had a good day preping all the steel tracks and where they weld to in the window apetures, grinding years of rust and paint off to get a good weld.
Also got the 'oxy' gear out and warmed and jacked out some bends from the bottom of the front main uprights, and welded in some new steel work, not and easy task, let me tell you.
Didnt get round to welding in the window frame tracks, they are all sat waiting for our attensions next time ;)
Got the other acc and the hyd rig loaded up in the van and brought them home, they now await my time durning the evenings over the next few months ;)
Few piccies for you of our efforts today
Lots of grinding to do

Done,well one side anyway ;)


One of the four horizontal tracks, waits my attensions with an angle grinder

First vertical in place, waits the welder

And the horizontals clamped and waiting

Welding in new steel in the right hand side front upright

Done, wating to cool,and then a lick of paint

And the left front upright bends before we got to work

Lots of heat

And abit straighter

Then the other side of the beam, just about there

Lots of progress as you can see, only small jumps forward in the time we have up there, but they are forward at least :)
Another job thats now well and truely ticked off the list is the welding of the window tracks, all done now, ready for the side cladding which will be sometime later this year, when funds allow


And one window frame, trial fitted and bolted in place, and it fitted perfectly !

It was then up into the front steel work to finish off removing some old steel work, all gone now
Top of the doors

Front cladding finished 7th July 09


Got some snaps that the cladding lads sent,
First parts going on

First sheet


Me leaning over inspecting ;)

Yours truely having a rest ;)

And the final top panels going on

Piccies for you, they sent me ;)
Start of the job

First corner


Done


Oppsite side


Done


So thats that 'bit' done
Next its fund rasing again, we need around 8k for the back doors refurbisment and rehanging work then another 3.5k for the rear cladding, so we are now very close, so please keep along coming along and supporting our 'do's' and we shall one day soon see it all finished ;)
Also got a 60's style personel side door and frame for the hanger knocked up at work


And delivered them both on Saturday morning


Heres a comparision for you, 2005 we had just found, untwisted, derusted and fitted the steel doors frame
And now

New walls


Also brought the mural to be hung up,this is a reproduction of a wall mural painted by Vaughan Radford in 1976 in the LTF hanger crew room at Binbrook, Terry Senior kindly sent me a high res shot and we have had it printed on a banner for the Q shed wall
Thanks Terry

And some prints to sell

And Dennis and John posed for me, as per the OCU course photos which the mural used to be used as a back drop

We got the left hand side window frames that I restored earlier this year, all bolted in place, they went a treat, unbeleivable considering, how long its been and what they have been though
Piccies say it all really
First bolt in

First frame in place ;)

'Tapping' out for top bolts


Last bolts

Done and the paint ready to go on


Looking good ;)
|
|
| |
|
vulcan558
Moderator


Location : Between Coventry and Leicester
|
| Subject: Re: Q shed and Lightning news 2009-09-12, 16:33 |
|
|
Well documented story there Andy.
really shows the dedication you guys have put into the history of the 2 jets.
and QRA shed.
|
|
| |
|
JG71
Admin


Location : Birmingham B17
|
| Subject: Re: Q shed and Lightning news 2009-09-13, 06:53 |
|
|
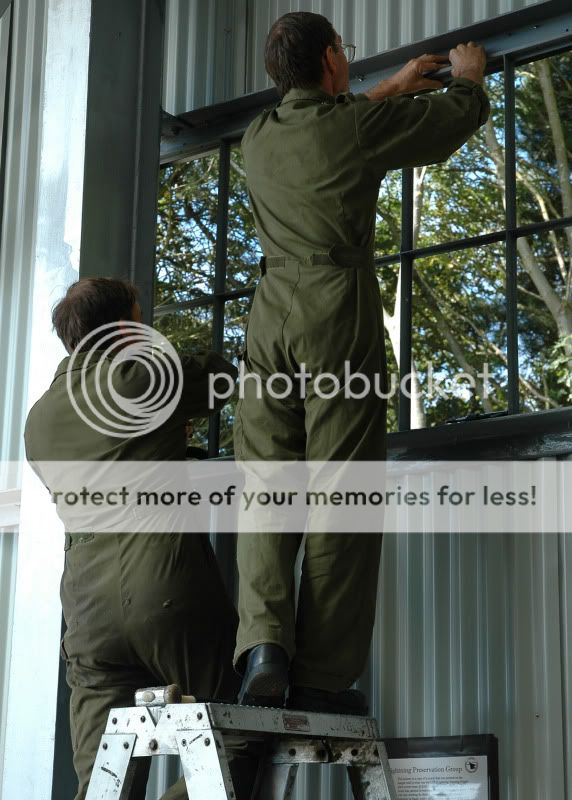
Bringing you right up to date with the work of my fellow members and friends at the LPG.
I took the trip down from Birmingham yesterday and photographed the on going hard work being made.Yesterday was all about getting the window frames in on the right hand side of the QRA shed.Which i am pleased to say went in very nicely.And as a pose to my images are indeed very straight.
The images below show what was done on Saturday.
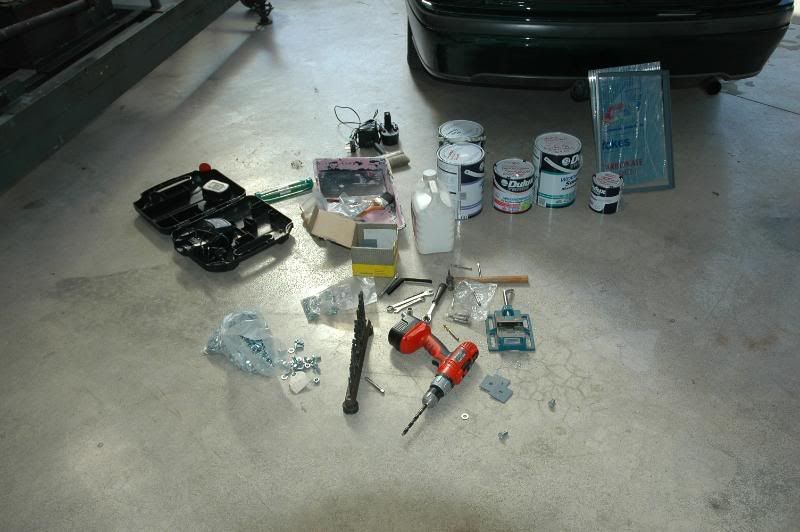
Andy and Jim (Everest windows)
Richard Norris painting the inserts

Tools of the trade
904 basking in the sun
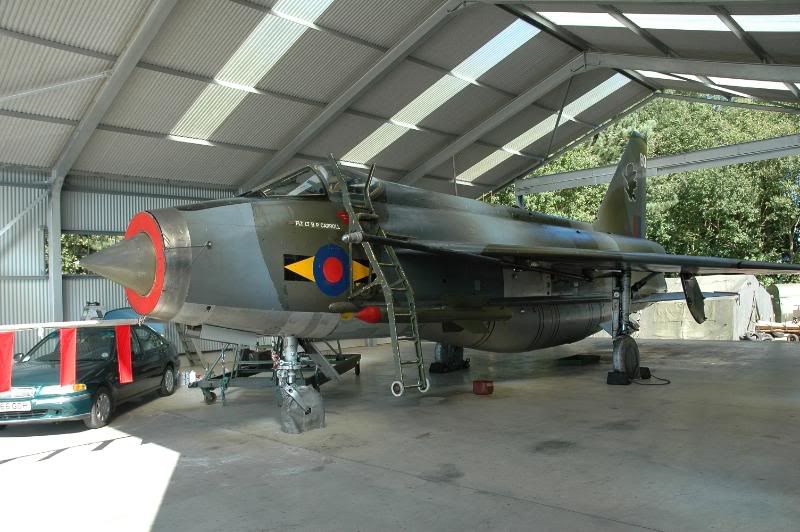
728 Molly as i call her looking serene

window frame in and straight unlike my shot.Just the inserts and windows to go.

|
|
| |
|
320psi
Location : Nottd
|
| Subject: Re: Q shed and Lightning news 2009-09-20, 14:32 |
|
|
Hi all,
Brillant day up there today, weather was perfect.
We cracked on and got the right hand side window frames bolted in place then spent the rest of the day, painting the inside silver and the outside 'cladding' green, looks superb now, if I do say so myself
First one in

2 hours later, all done

All painted silver

And all painted green


The window panels can go in next, ready for the bad weather to arrive
Its all progress
|
|
| |
|
JG71
Admin
Location : Birmingham B17
|
| Subject: Re: Q shed and Lightning news 2009-09-21, 05:35 |
|
|
|
Well done all.I think its the donnuts that keep you going lol.
|
|
| |
|
Sponsored content
|
| Subject: Re: Q shed and Lightning news |
|
|
|
|
|
| |
|
|
Q shed and Lightning news |
|
|
| Page 1 of 1 |
|
|
| Permissions in this forum: |
You cannot reply to topics in this forum
|
|
|
|
|
|
| |